How share state between components in React
In React, lifting state is a pattern used to share state between two or more components that don’t have a direct connection to each other but need to share data. By lifting state “up” to a common ancestor, multiple child components can access and update the shared state via props.
When to Lift State
Lifting state is typically done when:
- Two sibling components need access to the same piece of data.
- Child components need to communicate with each other through a shared value.
- You need centralized state management in a specific part of your component tree.
How Lifting State Works
- Identify the Shared State: Determine which piece of data needs to be shared between components.
- Lift State Up: Move the shared state up to the nearest common ancestor component where both (or all) child components can access it.
- Pass State and Functions as Props: Pass the shared state and any necessary update functions as props to each child component that needs access.
Example of Lifting State
Let’s say you have two sibling components: one component allows the user to input a name, and another component displays that name. To share this state, you lift it up to their parent component.
Step 1: Create Components
- InputComponent: Allows the user to type in a name.
- DisplayComponent: Displays the name.
Step 2: Lift State Up to the Parent
- Move the
namestate to the parent component. - Pass
nameand a function to updatenameas props to both child components.
Code Example
import React, { useState } from "react";

// Child component for input
function InputComponent({ name, onNameChange }) {
  return (
    <input
      type="text"
      value={name}
      onChange={(e) => onNameChange(e.target.value)}
      placeholder="Enter name"
    />
  );
}

// Child component for displaying name
function DisplayComponent({ name }) {
  return <h1>Hello, {name}!</h1>;
}

// Parent component
function ParentComponent() {
  // Shared state lifted to the parent
  const [name, setName] = useState("");

  return (
    <div>
      <InputComponent name={name} onNameChange={setName} />
      <DisplayComponent name={name} />
    </div>
  );
}

export default ParentComponent;
Explanation of the Example
-
Parent Component:
- The
ParentComponentmanages the shared statenamewithuseState. - The
setNamefunction updatesname, which is passed down toInputComponent.
- The
-
InputComponent:
- Receives
nameandonNameChangeas props. - Displays the current value of
namein the input field and updates it throughonNameChangewhen the user types.
- Receives
-
DisplayComponent:
- Receives
nameas a prop and displays it in an<h1>element.
- Receives
In this setup, whenever InputComponent updates name by calling onNameChange, the new name value is re-rendered in both InputComponent and DisplayComponent.
Important Points to Keep in Mind
- Only Lift State When Necessary: Lift state up only if multiple components need access to it. If a single component needs the state, keep it local.
- Avoid Prop Drilling: If you need to pass state across several layers of components, consider using React Context to avoid excessive prop drilling.
- One-Way Data Flow: By lifting state, React’s unidirectional data flow is preserved, making it easier to understand where the state is managed and updated.
- Immutability: When you update state, React re-renders the components that depend on it, which makes lifting state an efficient way to synchronize data between components.
Benefits of Lifting State
- Centralized State Management: By lifting state to a common ancestor, you create a single source of truth, making the state easier to manage and debug.
- Consistency Across Components: Any component that receives the lifted state via props will re-render when the state changes, ensuring that all components are always in sync.
- Enhanced Reusability: Components can be more reusable because they receive props instead of managing their own local state.
Common Use Cases for Lifting State
- Forms and Validation: For example, managing a form’s inputs and showing validation messages across components.
- Filterable Lists: If you have a search input and a list component, you can lift the search term state to filter the list based on the search input.
- Synchronized Inputs: When you want multiple input fields across components to be synchronized with the same value.
Summary
- Lifting state involves moving shared state up to the nearest common parent component.
- Props are then used to pass the state and update functions to the child components.
- Lifting state is helpful when multiple components need access to the same piece of state, ensuring consistency and a single source of truth.
This pattern helps maintain React’s one-way data flow and makes components more modular and reusable.
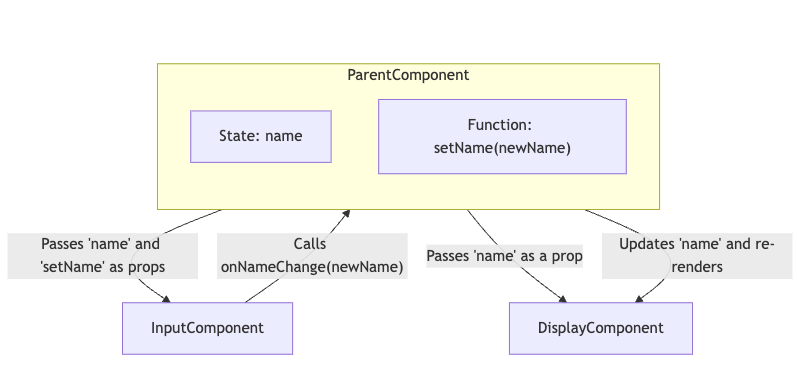
Example of how shared state works
This updated diagram provides a clear view of how lifting state up centralizes state management within a common parent component and how data flows between components.
- ParentComponent:
- Now visually contains
stateandsetNameto indicate thatnameis managed withinParentComponent. staterepresents the shared data (name), andsetNameis the function to update it.
- Now visually contains
- InputComponent:
- Receives
nameandsetName(passed asonNameChange) fromParentComponent. - Can trigger
setNameto updatename.
- Receives
- DisplayComponent:
- Receives
nameto display, updated automatically whennamechanges inParentComponent.
- Receives